
I've been working as a frontend developer for the past 2 years. In that time, I've seen the same mistakes come up again and again — not in code, but in thinking.
This blog is my attempt to share the mental models that made the biggest difference for me. No fluff, just principles.
Heads up: I'm not a native English speaker and fairly new to blogging. Go easy on me.
Rule 1 — Needs Over Design
Here's what a lot of developers do when they start a new project:
# Spin up a new Next.js project
npx create-next-app@latest my-app
cd my-app
npm run dev
They delete the template code, stare at a blank screen, and immediately start asking:
- Should I use a top navbar or a sidebar?
- What's the color palette going to be?
- Should the hero be full-screen?
Stop. None of that matters yet.
Before you open Figma or write a single component, grab a pen and paper (or open Notion/Obsidian) and answer these questions:
- What is this project actually about?
- What is the main goal?
- Who is the target audience?
- What problem does it solve?
A Practical Example
Say you're building a flight booking service. The first feature you'd tackle is searching for a flight. That means your interface needs exactly these things:
- A departure city field
- A destination city field
- A departure date field
- A return date field
- A search button
That's it. Now look up some reference designs on Dribbble or Behance:
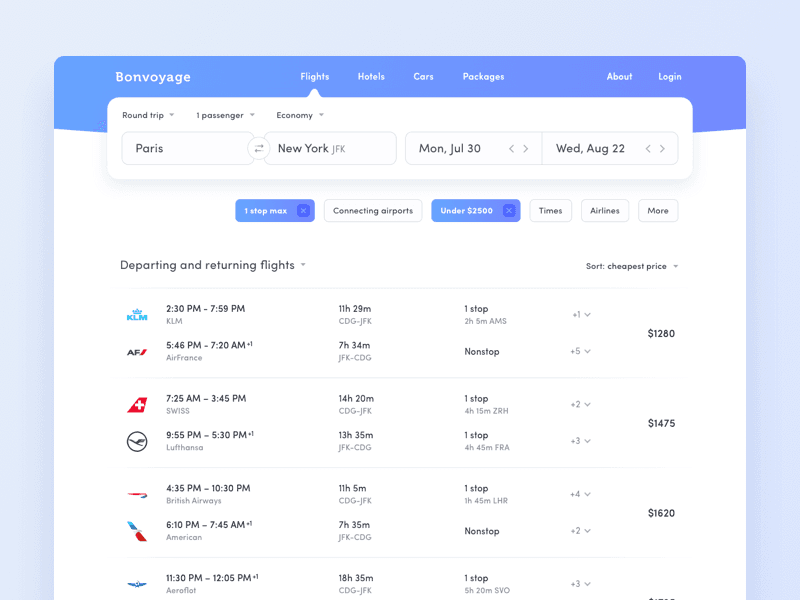
They look great — but do you actually need everything you see there? Think critically. Strip it down to what your users need.
Remember: User experience matters most. Design is only about 30% of that equation.
Rule 2 — Improve Incrementally
In the early stages, resist the urge to make everything perfect. Don't think about:
- Which typeface to use
- Your exact color palette
- Micro-animations
- Icon sets
That stuff will all matter eventually — just not right now.
Your only goal in the beginning is a functional, usable product. Once you have that, you start layering on improvements:
- Refine the layout and spacing
- Introduce your color palette
- Add icons and illustrations
- Layer in animations
Ship ugly, iterate toward beautiful.
Rule 3 — Hierarchy Is Everything
Even if you have a whole color palette ready, don't apply colors first.
Start with a grayscale design. It forces you to get the fundamentals right:
- Spacing (padding and margins)
- Font sizes and weights
- Line heights
- Visual grouping
It's more challenging, but you end up with a solid structural foundation. Adding color on top of a well-structured grayscale design is easy. Adding color on top of a broken layout just makes it a colorful broken layout.
Grayscale First
Then Add Color
Small tip: Don't overdo it. A clutter-free, to-the-point design almost always beats a visually "rich" one.
Rule 4 — Don't Design Too Much Upfront
You don't need to design every feature before you start building. In fact, it's better if you don't.
Designing for every edge case in the abstract is incredibly hard:
- How do you handle a form error message that's 3 lines long?
- What does a table look like with 2,000 rows?
- What if two events fall on the same date?
Trying to solve all of this in Figma before writing code is a recipe for frustration.
Work in Short Cycles Instead
Rather than designing everything upfront, follow this loop:
- Sketch a simple version of one feature
- Build it in code
- Discover the real edge cases that only show up in a live interface
- Iterate until it feels right
- Move on to the next feature
The real interface will surface problems your imagination never would. Build early, fix fast.
That's it for Part 1. Four rules, all of them more about thinking than coding.
Stay tuned for Part 2 — where we'll get into typography, color, and spacing in more depth.